Sunday, February 28, 2010

Snapshots from Ubuntu

A big, gigantic, nay, HUGE thank you to my friend and co-worker Rachel, who also works as a server at the Michelin Star rated Ubuntu in Napa. She mentioned I should bring some friends for lunch, and I thought that was a pretty good idea. It turned out to be a great idea. Maybe the best idea of the month.

So I took pictures. Because she said I could. Brian and Leah took pictures too. We were those people. Apologies, all around.

So I don't know what to tell you. This meal was amazing. The space was amazing. The wines were incredible. It was a memorable meal, and I think you can garner some idea of the explosions of taste from the pictures. They don't really do it justice, but they'll give you an idea.

We were advised that this was a small plates kind of place, and were encouraged to order generously and share the dishes. We thought that was an excellent idea.

If you had been at the table next to ours this afternoon, here are a few things you might have overheard:


  • "This is wrong. This is just dirty and wrong." - Leah (she was being sarcastic)
  • "If someone said 'Why eat at a vegetarian restaurant?' I'd put these carrots in front of them and say, 'That's a carrot. BAM!'" - Brian
  • "I want to slap this in the face it's so good." - Leah
  • "SHUT. UP!" - Leah
  • "Hey Sexy, let's hang out." - Brian
  • *High Fives* - All Around the Table

When you taste a dish, stare it down and feel compelled to tell it to shut up, that is a very good thing. It should give you some idea of the caliber of this meal. I mean, dessert came out in a jam jar. A JAM JAR!!! How awesome is that?

Very, is the answer to that one.

So here you go. Some snapshots. Be jealous, be very jealous. And the next time you're in Napa, do yourself a favor and book a reservation.


"French Breakfast" radishes, burrata and torn spring onion donuts


Borage and Lemongrass Curry - chard condimento & pickled stems, whipped coconut, preserved lemons


Marinated "Merlin" Beets with Goats Milk Labneh


Escabeche of Nantes Carrots, Local Citrus & Marash Chili


Celtuce ala Gringlia with Red Miso and Parmesan - Sardinian Pearl Pasta, Fresh Bergamot, Bitter Greens


Young Roots with their Braised Greens - Ritual Coffee Jus, Spiced Garnet Yam & Cocoa Nibs


Farm Egg 'a la Catalan', Stewed Chickpeas with Sauce Romesco


Yellow Corn Grits, Goat's Milk Ricotta


Meyer Lemon Sorbet Float - Orange Cream Soda, Beet Tapioca, Kieffer Lime Granita


Vanilla Bean 'Cheesecake' in a Jar - Sour Cherry with Verbena, Teeccino Crumble


Thanks again to Rachel, and to Ubuntu. It was the highlight of my week.

Friday, February 26, 2010

California ABC Cracks Down on Bay Area Beverages


Photo by Kat Wade of the SF Chronicle


In San Francisco (and the greater Bay Area in general) the mixing of a good cocktail is considered an artform. People take it very seriously. They know who the good bartenders are, where they are, and what time their shift starts. Ask almost anybody around here where you can get a decent Gin & Tonic, and they'll ask if you like your tonic homemade. They can point you in the direction of a good Pisco Sour, the best Manhattan, or a proper Gimlet.

Small batch distillers tend to do pretty well around here, and there are a ton of places infusing their own liquors. Finding a house-made infusion on a menu tends to make my eyes light up (it's something I've attempted on my own in the past with Meyer lemons and vodka, and I loved the results...) but those concoctions may be a thing of the past in California, if the Alcoholic Beverage Control has it's way. They're cracking down on establishments infusing their own liquors: a policy that makes no sense, considering that these infused liquors pose basically no health risk.

The master distiller at one of my favorite local spots, St. George Spirits in Alameda, had this to say in response to the crack down, "alcohol is a fantastic solvent. Not only is it biologically intert - nothing can survive in it - it also has a way of pulling all of the flavorful oils from the skin of whatever you're working with."

Today's San Francisco Chronicle has a front page article about the crack-down and the response. The Bay Area is already up in arms about it. I'll be interested to see if the ABC has evidence of actual cases where house-infused liquors have made anyone sick. It doesn't seem likely, and in truth, seems like a totally frivolous use of resources and funds in this already cash-strapped state.

You can read the article here.

Tuesday, February 23, 2010

Knife Skills, Thoughts and Commis in Oakland

Awhile ago, I started getting more serious about cooking. I began to notice that this was what I turned to, to relax. It's where I was doing my best thinking, chopping onions and mulling over whatever happened to be going on in my life at the time. It's also where I was having the most fun, and it's what I wanted to share with the people I loved. It's where my thoughts were more frequently turning to during the day . . . What recipe to try next? Which new technique to experiment with, and to hone? Which restaurant to try?

I tracked my obsession: sitting at a bars, craning my neck, trying to catch a glimpse into various kitchens to see what was going on in there.

I made my first loaf of bread. I made cheese. I perfected a chicken dish that I will carry with me for the rest of my life. I slugged my way through four different chocolate chip cookie recipes (which, for sanity's sake were then foisted upon friends) in effort to find the ultimate cookie. I fell asleep with cookbooks open across my chest, and Gourmet, Bon Appetit and Saveur magazines strewn across the floor. I poured over other food blogs, watched cooking demonstrations on youtube. I was more than a little thankful at that point not to have cable, as I'm sure if I did, the Food Network would have been on almost constantly, and I would have found Mario Batali's appearance on Iron Chef America a compelling reason to never leave the house.
(No cable for me!)

I toyed with the idea of culinary school, but at an easy 60k for 2-3 years, it didn't seem like the best option. I considered a smaller program in Berkeley, but when I sat in on a class there, I quickly realized it wasn't the kind of program I was looking for.

So I decided to start small. I took a cooking class at a company in Berkeley called Kitchen on Fire. I started with their Spanish Seafood cooking class, which offered 5 recipes. Seafood is something I love, but tend to be intimidated by when cooking it myself. The class was fantastic. It was so much fun, and I was so excited to be doing something really hands-on. After sitting at a desk and staring at a computer for most of the day, it was more than a welcome relief.

Last night I took their knife skills class. I figured I'd better be sure my fundamental skills were correct if cooking is something I'm going to pursue any further. Turns out, I have a lot to practice. Anyone need some onions chopped? I dove through about 10 of them last night, along with 7 carrots, 8 celery stalks, 10 cloves of garlic, half a bunch of parsley, cilantro, mint, basil, 3 bell peppers and 4 zucchini.

I've never been the front row student, you know, the one who turns in a paper a day early, or arrives a good 20 minutes before class to go over the lesson plan. The person whose hand shoots up at the request for a volunteer. I've never been that girl. Until now. I pounced on that bag of onions. I had no qualms about speaking up, asking questions, asking for advice or a demonstration when needed. I can't tell you how much I enjoyed it, or how excited I was.

I wish I had some pictures for you. It completely slipped my mind. But I can say that I'll be taking more classes there. They have a 12 week "Boot Camp" course that covers just about everything, starting with the knife skills, moving on to sauces and stocks, braising, bread, grilling, etc. I can hardly wait.
So who knows where this will go? If I had my way, I'd somehow be making my living off of this sort of thing, though I have no idea how. At some point, I'd love to do an internship in a kitchen, becoming an unpaid chopper of onions, and segmenter of citrus.

But until then, I'll continue with the classes, and I'll continue to sit at the bar of some great restaurants, trying to sneak peeks.
On that note, I did remember to bring my camera to the newly Michelin-starred Commis on Piedmont Avenue in Oakland. Unfortunately, the pictures didn't turn out so well (and also, I hate to be that person who takes pictures of all their dishes in a restaurant, and I try to avoid it as much as possible) so I only have a couple to indicate the quality and beauty of what we ate. If you get a chance, I can't recommend this place enough. It was truly a great experience. If you go, I recommend splurging for the wine pairings.

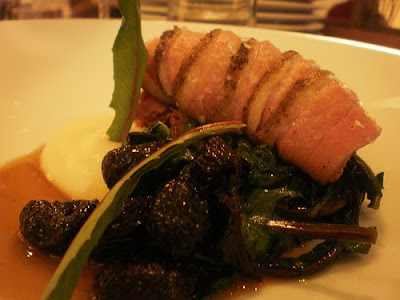
Duck cooked sous vide with sour cherries, mustard greens & parsnip puree


Panna Cotta with berry gelee & Muscat pairing

Monday, February 22, 2010

So Spoiled - Bolognese Sauce


February in the Bay Area. It's a bit unreal actually. The trees are bursting into blossom, the hills are a bright and verdant green, the temperature hovers around 65 or so, every so often creeping it's way up to 70, and the chill of the winter sun starts to subside a bit, giving off a warm, gentle light that promises spring is just around the corner.

We're spoiled here. A light sweatshirt or sweater will do when walking around town. The farmer's markets are open year round, and the outdoor German beer hall, The Tourist Club on Mt. Tam, never closes. Even in the dead of a Bay Area winter.

To be fair, it was a bit cold on Mt. Tam yesterday. A jacket was required. But once you scrounged out a patch of sun on the big wooden deck, it was warm and beautiful.

The Tourist Club happens to be my favorite Bay Area hike. I'm a fan of destination hikes. Especially when they end in tasty and refreshing beverages. It just makes it all seem worth it. And if the beer wasn't enough, there's the view.


Not bad, eh? The picture doesn't do it it justice.

So, after a decent hike, and a pint of beer, the chill in the air gained a bit of a bite. Clouds were rolling in and the forecast called for rain. I knew a simmering bolognese was in my future.

I've been craving Italian food lately. Actually, I almost always crave a bowl of pasta and a good sauce. There's something so right about it. I turned my attention to my Le Cruset, laundry and the Olympics. A pretty good Saturday evening, if you ask me. I'd had more than a few nights out in the past week and I was dying to stay home and relax. This bolognese really hit the spot.

I sort of riffed off Macella Hazan (for her inclusion of tomatoes and her pinch of nutmeg) and Mario Batali (for his use of garlic). I wouldn't call this sauce strictly authentic. That would require less tomatoes and zero garlic, I think. Two things that, in my mind, always enhance a sauce. I really couldn't have been happier with the results. The epitome of comfort.


Bolognese Sauce
adapted from Marcella Hazan & Mario Batali
serves about 6

4 tbsp olive oil
3 tbsp butter
1 medium onion, chopped
1 stalk celery, finely diced
1 carrot, finely diced
2 cloves garlic, thinly sliced
1 lb ground beef
1 cup milk
1 cup dry white wine
1 whole nutmeg, or a pinch of ground nutmeg
1/2 tube tomato paste
1 cup canned Italian plum tomatoes, diced or torn into pieces, with juice
1-¼ to 1-½ pounds pasta, cooked and drained
salt & freshly ground pepper to taste
Parmesan for topping

Heat oil, butter and chopped onion in a heavy 3-½-quart pot and turn heat to medium. Cook and stir onion until it has become translucent, then add chopped celery and carrot. Cook for about 2 minutes, stirring vegetables to coat well.

Add ground beef, a large pinch of salt and a few grindings of pepper. Crumble meat with a fork, stir well and cook until the beef has browned, and the red color has disappeared from the meat.

Add the milk and simmer gently, stirring frequently until the liquid has evaporated. Add a tiny pinch or grate of the nutmeg and stir.

Next, add the wine. Let the liquid simmer until it has evaporated, then add the tomatoes and tomato paste, and stir to coat all ingredients. Once the mixture beings to bubble, turn the heat to low and continue to cook at a low simmer for 1 1/2 hours. If time permits, simmer for 3 hours, stirring occasionally.

Taste for salt and pepper. Cook pasta in salted water according to directions. When pasta is cooked and drained, add half a tablespoon of butter to the pasta, top with sauce and Parmesan. Serve while hot.


Thursday, February 18, 2010

I Couldn't Resist - Creamy Polenta with Sausages, Mushrooms and Marinara Sauce

Some people give you the crazy eye when you tell them Valentine's Day happens to be your favorite holiday. At the very least, they give you the side eye. They'll tell you it's a fake, commercially created holiday that only serves to make single people feel badly about themselves. I think they must not appreciate baked goods, flowers and an extra incentive to hug it out. I tell them they must never have experienced the famous V-Day pillow fight on the Embarcadero in San Francisco. They must not enjoy drinking champagne (because that's just what you do on this day) eating steak and watching the classic romantic comedies (such as When Harry Met Sally, Sleepless in Seattle, and whatever else happens to be on AMC at the time). How can you not like Valentine's Day? Honestly! Who would refuse a cupcake on this day?

I may come off as a cynic when it comes to love and romance, but in truth, I'm a total sap.

Like I said. It's my favorite holiday. And I will not apologize for that.

So after my fantastic Valentine's Day weekend that included wine tasting with a friend in Sonoma; a visit with my favorite appetizer, the Pork Belly Bun at Heaven's Dog and several glasses of champagne, my body decided to go on strike. Most of Sunday and all of Monday were spent in bed with a glass of juice and little else. My body ached, I was feverish and my throat was unbelievably sore. So much for a good ending to the weekend of love.

So when 4 o'clock rolled around today, and I came across Mark Bittman's newest Minimalist recipe in the New York Times, I was relieved to discover I had my appetite back. His polenta with sausage looked amazing, and I could tell it would hit the spot. I topped it off with some purple basil.

Polenta is such an easy, quick-fix for a meal. The whole thing came together in about 20 minutes. It was savory and comforting. It's something I haven't cooked much of before this year, but more and more, it's becoming a go-to weeknight dinner.

More on the Sonoma wine discoveries next time, also, a visit to Oakland's Commis...


Creamy Polenta with Sausages, Mushrooms and Marinara Sauce
adapted from Mark Bittman
serves 2

1 tbsp olive oil
2 good-quality Italian sausages
1/2 cup medium-to-coarse cornmeal
6 mushrooms, thinly sliced
1 clove garlic
1/2 cup marinara sauce
salt
1/4 cup Parmesean
freshly ground black pepper
several fresh basil leaves for garnish

Heat olive oil over medium-high in a skillet. Add the sausages and cook for about 20 minutes, turning occasionally and lowering heat if necessary. After about 10 minutes, add the mushrooms and brown, stirring occasionally. Add the garlic and marinara to the pan during the last 2 minutes of cooking.

Meanwhile, put cornmeal in a medium saucepan along with 1/2 cup water and whisk well to to eliminate any lumps. Put pan over medium-high heat, sprinkle with salt and bring to a boil. Reduce heat to medium and continue to cook, whisking frequently and adding water as needed to keep mixture loose and free of lumps, between 3 and 4 more cups. If mixture becomes too thick, simply add a bit more water; consistency should be similar to sour cream’s.

Polenta will be done in 15 to 30 minutes, depending on grind. Add the cheese. Taste and add salt, if necessary, and lots of pepper; serve topped with sausages, mushrooms and sauce. Garnish with pepper and basil leaves.

Wednesday, February 10, 2010

An Ugly Looking Thing - Celeriac, Fennel & Apple Salad


Before tonight, I'd never had celeriac (also called celery root) any other way but pureed under a steak. It tried (and failed) to pass for mashed potatoes. You didn't fool me, celeriac, I know mashed potatoes when I see them. And you, are not mashed potatoes.

So I'd really never given it much thought beyond that. But, this morning I spent some quality time with my newest issue of Bon Appetit on the bus, and came across a charming essay and recipe from Molly Wizenberg which extolled the virtues of this ugly duckling of a vegetable. It peaked my curiosity, so I decided to give it a try. I was skeptical, it's true. Sitting on the shelf of my local produce market, the celeriac was an ugly looking thing. Covered in hair-like roots, dirt and dimples. But I then remembered several winning Top Chef recipes that put the vegetable to good use. I snagged one of the less offensive looking ones, and headed home to experiment.

And if you need a few more reasons to try it, how about this? The nutritional benefits include high fiber, high vitamin c, high in vitamin B6 and potassium. A good thing to eat if you're cautious about cholesterol and heart disease. The fiber makes it especially filling.

The taste was mild and refreshing. A perfect compliment to the apple and the fennel, the taste lying somewhere near a cross between the two. Doused in a sour and tangy vinaigrette, it was filling and delicious. It was also a welcome reprieve from the pounds and pounds of kale and chard I've been eating. I love those two things as much as the next person, but I've been eating them several times a week (if not more) for the past few months. It was time to broaden the winter salad options. And this is a perfect solution.


Celeriac, Fennel & Apple Salad
adapted (slightly) from Molly Wizenberg's Bon Appetit recipe

for the vinaigrette


1 tbsp Dijon mustard
1 tbsp champagne vinegar
1 tbsp fresh lemon juice
1/2 tsp salt
1 small garlic clove, pressed
2 tablespoons olive oil

For the salad

1/2 medium celery root, peeled, cut into matchstick-size strips
1/2 medium fennel bulb, halved lengthwise, thinly sliced
1/2 peeled Gala apple, cut into strips

Whisk the vinaigrette ingredients together in a small bowl. Combine celery root, fennel, and apple in large bowl. Toss with vinaigrette. The original recipe calls for shaved Parmesan on top. I didn't have any, and I don't think it needs it, but next time I'll add it in.

Monday, February 8, 2010

A Winter Standard - Citrus Salad with Avocado and Micro-Greens


The farmers market is an embarrassment of riches right now. Blood Oranges, Pommelos, King Grapefruit, Cara Cara Oranges, Meyer Lemons and Mineolas. Orange, gold, green and yellow orbs of all different sizes, filled with juice, sweet and sour. It's the perfect time to make my favorite late winter salad, which happens to be as beautiful as it is adaptable.

My standard version has avocado layered in with the citrus, however, today when I slid my knife through an avocado I'd bought a few days earlier, I saw that it was too late for that poor sucker. It had already gone brown inside, and was a waste. Spoiled avocados are truly one of the great disappointment of life. I cursed myself for not having used it earlier, and pressed on with a scaled down version.

If I'd had some fennel handy, that would have been a good addition as well. Thinly sliced red onions, fresh mozzarella, I've even had a version with squid and frisee at my favorite restaurant, Pizzaiolo in Oakland. But still, my favorite is the citrus, avocado and micro-greens. The fresh tart taste is a welcome reprieve from the usual heavy winter meals.


Citrus Salad with Avocado and Micro-Greens

It seems silly to write out a recipe for this. Just by looking at the picture, you get the idea. For this one, I used one pommelo, one ruby red grapefruit, one cara cara orange and one blood orange.

The trick to slicing the citrus is to cut the top and the bottom of the fruit, and then slice the peel from the fruit, making sure to remove as much of the white pith as possible. Once the peel has been removed, slice the fruit into disks, about 1/2 of an inch thick. Layer the citrus onto a plate.

If I'd had a good avocado, I would have sliced half of that and layered it in with the citrus. I drizzled about a tablespoon of good olive oil and a teaspoon of red wine vinegar over the fruit, and sprinkled some sea salt over that. Finally, I tossed a few micro-greens on top. I got mine at the farmers market, but you can also find them at Trader Joe's.

Friday, February 5, 2010

It Has It's Own Day.

Did you know that today is World Nutella Day?

It's true. I read it on Google.

Look, here's a picture to prove it!


So in honor of this most holy of days, I've decided to re-post the only Nutella Cake recipe you will ever need. Fellow Bloggers, Readers, and Lovers of Nutella, I give you Nigella Lawson's Nutella Cake...


These days it seems I look for every and any excuse to make cake. I have been on a bit of a baking rampage, and my tiny studio kitchen is nearly groaning under the weight of so many cakes. It's gotten quite ridiculous. Not that I personally have a problem with cake for breakfast every day, my waistline, however, does indeed have a problem with that. There's the chocolate one resting comfortably in the freezer, the lemon berry cake on top of the stove (with enough slices taken out to cause it to bear an eerie resemblance to Pacman) and now there's the birthday cake on the counter. So. Much. Cake.

Pacman in cake form.

And so I pawn them off on friends and co-workers. I offered to make this latest cake for a friends be-lated birthday. When I asked what kind he wanted he mentioned something with hazelnuts and chocolate. That of course, brought to mind one thing. Nutella! Genius! Had anyone ever thought to make a cake out of nutella before? Of course. Nigella Lawson, in fact. I should have guessed. She cooks, she speaks in a gorgeous English accent, she's pretty easy on the eyes and she makes cakes out of nutella. This woman could obviously rule the world if she chose to do so. Luckily she chooses to simply share her recipes instead.

I poured over the recipe. It was madness, for sure. Not only does it call for a whole stick of butter, two full chocolate bars, and rum, but it uses an entire jar of nutella. This cake is obviously not for the faint of heart, but considering the culinary requirements for an earlier cake experiment (4 sticks of butter!) I was not to be intimidated. Now that cake was crazy!

It was a dreary, drizzling kind of day. I hauled myself off to the gym to try and make up for the breakfast problem of the week, and then started in with Elliott Smith to accompany me. Elliott makes a fine cooking companion. Of all the albums in my possession, his are the ones I never tire of. If only there were more of them.

And here is the result! So dense and delicious and full of nutella! I'm quite pleased with it, and it really couldn't have been easier. Nothing to fear...as long as you have plenty of people to share it with, of course.

Oh baby! Nutella in cake form!

Nutella Cake with Chocolate Hazelnut Ganache
from Nigella Lawson

Cake:
6 large eggs, separated
pinch salt
1/2 cup unsalted butter, softened
1 13-ounce container Nutellla
1 tablespoon rum
1/2 cup finely ground hazelnuts
4 ounces semi-sweet chocolate, melted and
cooled

Ganache:
4 ounces whole hazelnuts
1/2 cup half and half (she calls for heavy cream but I was out, half and half worked well)
1 tablespoon rum
4 ounces semi-sweet chocolate

Whipped egg whites, yolks, butter and the *secret* ingredient

Preheat oven to 350 degrees; butter a 9-inch springform pan. In a large bowl (preferably metal),
whisk the egg whites and salt until stiff. In another bowl, cream the butter and Nutella, then add
the rum, egg yolks, and ground hazelnuts. Fold in melted chocolate.


Add a blob of beaten egg whites to the chocolate batter, and mix gently until well-combined. Fold in the remaining whites, one-third at a time, very gently but thoroughly. Pour into springform and bake for 40 minutes. Test for doneness by inserting tester, which should come out mostly clean; lightly pressing finger into top to check for a slight bouncing-back; and observing edges beginning to separate from pan. Let cool completely, in pan, on a rack.


Toast the hazelnuts in a dry skillet, or toaster oven shaking them around frequently. Do it for about 4 minutes, or until they are lightly browned, then let cool completely. If hazelnuts came with skins on, put them in a towel after toasting and rub around; this will remove most of the skins.


Chop chocolate, and add to sauce pan with half and half and rum over medium-low heat. Once chocolate is melted and components are combined, whisk until mixture reaches desired thickness, then cool. Remove rim of cake pan and pour cooled ganache over, spreading lightly to create a smooth, shiny surface, and apply hazelnuts all over.

Thursday, February 4, 2010

State of Mind - Pan Seared Salmon with Wasabi Mashed Potatoes


"What do you think says more about you, the things that are under your bed, or what's on your bedside table?" - Overheard on the 51 bus today

I'm skeptical about this one. First of all, I cleaned out the contents of what was under my bed when Amber gave me my birthday present this year (like a Saint, she deep cleaned my apartment, which of course meant I had to clean it first to save myself embarrassment) and now all that remains are a couple old magazines, computer boxes and a printer.

Does that mean I'm boring?

Also, I think I heard Oprah say once that the contents and organization of your closet reflects your overall state of mind. So if it's cluttered and messy, your inner life probably is as well. Now that I think about that, it seems really depressing. What if the same goes for whatever's under the bed? I have a printer clouding my peace of mind?

Let's move on to the bedside table.
  • Several candles and candle holders
  • matches
  • lamp
  • 3 giant white hydrangeas in a vase
  • an antique bottle
  • enamel tray
  • half empty glass of wine...or is it half full...
Hmmm. That's more like it. And I hope it's a bit more informative than whatever is under the bed.

Tonight I made one of those dinners that made me exclaim, "Oh hell yes," upon taking a bite. This, is what it's all about my friends. I improvised, knowing that I wanted wasabi mashed potatoes, I bought a beautiful piece of salmon from Ver Bruges down the street, and whipped up a sort of asian sauce to pan sear it with.

If you've never had wasabi mashed potatoes, you should really remedy that immediately. It's the kind of thing that might sound a bit strange at first, but then you take a bite and you wonder where they've been all your life.

This one is going to be in the repertoire for a good long time. Hell, yes.


Pan Seared Salmon with Wasabi Mashed Potatoes
For the Salmon


1 Large Salmon Fillet, about 1 lb, cut into 2, or 2 8 ounce fillets
1/4 cup plum sauce
1 tsp chili sauce (such as siracha)
2 tbsp soy sauce
2 tbsp rice wine vinegar
3 tbsp red wine
1 clove garlic, minced
1/4 tsp fresh ginger, minced
2 tbsp canola or olive oil

Pre-heat the oven to 350. Season the salmon fillets with salt and pepper. Heat 2 tbsp canola oil or olive oil in an oven-proof saute pan over high heat and sear the salmon on both sides until golden brown, about 2 minutes for each side. Combine the plum sauce through the ginger in a small bowl, and whisk together with a fork. Generously brush the sauce onto the fish. You might have a little sauce left over. Put the pan into the oven to finish cooking. Baking time will depend on the thickness of your fillet. Check for desired doneness.

For the Wasabi Mashed Potatoes

1 lb russet potatoes, scrubbed, peeled and quartered
1/2 cup cream or milk
2 ounces of butter
2 tsp wasabi paste

Fill a large pot with cold, salted water. Add the potatoes and bring to a boil over high heat until done. Check with a fork for desired doneness. Use a ricer to mash. Add milk or cream, butter, and wasabi. Add salt to taste.

Serve fish over wasabi mashed potatoes.

Monday, February 1, 2010

Lazy Saturday - Honeymoon Pancake


When I was growing up, lazy Saturday mornings consisted of cartoons, friends sleeping over, and the promise of Honeymoon Pancakes, hot out of the oven. The recipe was there in the box, on an old faded and yellowing note card, written in my Grandmother's handwriting. It wasn't until years later that I realized nobody else called it a Honeymoon Pancake, but instead, a Dutch Baby, or a German Pancake.

But I refuse to use the common names. I like our family name for it much better than any of the others. It has the air of special occasion about it. And you can't help but feel that way anytime you pull one of these out of the oven. The way it puffs up to present itself, the steam rising and the edges golden brown, the butter sizzling in the pan and the toppings of fresh lemon and powdered sugar on top. It's a much requested breakfast dish with my friends and family, and I can't help but feel a sense of pride when setting one on the table. It always looks and smells fantastic.

This past New Year's my best friend even made a savory version for dinner. She added garlic and caramelized onions, and we all marveled at what a simple and delicious dinner it was. It goes to show how adaptable this dish is. Like crepe's, it can be sweet or savory, served in the morning or at night. Bake it with berries added straight to the batter, sauteed vegetables on top. Cheese would be a great addition. You could serve it a million different ways. But my favorite is still the old family classic. Served around 10am on a lazy Saturday, with good friends and family, and a squeeze of lemon and spoonful of powdered sugar on top.


Honeymoon Pancake


3 eggs
1 scant cup milk
1 scant cup flour
a pinch of salt
3 tbs sugar
1 tbsp butter

Preheat the oven and an ovenproof skillet to 450 degrees. The pan needs to be very hot before the ingredients are poured in. Mix the eggs, milk, flour, salt and sugar together in a bowl. Remove the pan from the oven and put the butter in. When the butter has melted, pour the batter in and bake for 15-20 minutes, until the pancake is puffy and golden brown on the edges. Serve with lemon wedges and powdered sugar.

Wednesday, January 27, 2010

It Was a Close One - Bittersweet Chocolate Truffle Tart


This was a near disaster. Can you imagine the anticipation of a perfect chocolate truffle tart, only to have it turn into a complete and utter failure? The Horror, the HORROR! Thankfully, it turned out well in the end, and I even learned a few things in the process. Has chocolate ever seized on you? Meaning that when you add a bit of liquid to the chocolate mixture, it begins to clump up? I'd never experienced that before, and I was immediately convinced I had ruined the luscious chocolate tart I'd been trying to create for my Sister. She was alarmed by my cries of distress, and in her older sister wisdom, she calmly stepped over to the computer to find the remedy online. The solution was to add more liquid (cream) until the mixture became smooth again.

The reason chocolate seizes, is that the chocolate itself is dry, without any water contact. When liquid hits it, the sugar and cacao absorb it and clump together. To fix that, more liquid needs to be added so that the chocolate becomes saturated and turns into something more like a syrup.

So, the near disaster became a learning opportunity, and the tart was saved. Not only was it saved, it was divine. Literally, a chocolate truffle filling. Rich and completely decadent. I caught my sister several times in the following nights, sneaking a slice here and there once my nieces had gone to bed. I also caught my Father and my Mother sneaking slices as well, until two days later, when the tart had completely and mysteriously disappeared...

All I know is, I only had one slice.

And if I didn't, I was sly enough to sneak them when no one else was around. But really, who's to say?

A side note concerning the crust: I used the extra pine nut crust I had from the Lemon Tart recipe I'd made the previous week (it was a tart happy month in our house) and I thought it was perfect for this, but I'm sure a basic crust recipe would do just fine. Feel free to substitute.


Bittersweet Chocolate Truffle Tart
adapted from several sources

6 ounces good quality bittersweet chocolate (such as Scharffen berger)
1/2 cup butter
1/4 cup sugar
1/2 cup heavy whipping cream
1 tsp vanilla
3 eggs
1/4 tsp salt


While your tart crust is baking, prepare the chocolate truffle filling. Add chocolate and butter to a heavy-bottomed saucepan over low heat. Melt and stir frequently. When the mixture is thoroughly melted, add in the sugar and vanilla. Whisk the eggs, salt and cream together in a medium mixing bowl until well-combined. Add a small amount of the chocolate into the egg mixture, and then slowly add the mixture back into the chocolate, mixing until smooth and glossy. Pour the mixture into the baked tart shell. Bake in a 350 degree oven for 20-25 minutes, until the chocolate filling has set. It should shake ever so slightly when done. Cool on a wire rack for 30 minutes, and then chill in the refrigerator, uncovered, for two hours until the filling has set and firmed completely. Dust with a small amount of cocoa powder, if desired.

Monday, January 25, 2010

Comfort in a Spoon - Marcella Hazan's Tomato, Onion & Butter Sauce


The first time I left the country, I was gone for a couple of months and towards the end of the trip I was incredibly homesick. It wasn't that I was having a bad time, on the contrary, swimming through the Mediterranean, hiking through mountain ruins and eating the best food I had ever had, I was truly having the time of my life. But I was so very far from home. I remember calling my best friend from the boat headed to Corsica. The minute I heard her voice I burst into tears, my phone card ran out two minutes into the conversation. These were the days before there was an internet cafe on every corner. I felt so removed. The next time I traveled so far away was different. I was studying in Oxford for the summer, and I was well equipped with internet and phone cards. The only times homesickness struck was when I was alone on a train, or at the end of a long day trying to fall asleep. That's when I would put on the same four Elliott Smith songs. They became a blanket of comfort around me, either lulling me to sleep or just feeling familiar while I was so far away from everyone I knew and loved. To this day, whenever I hear one of those songs, I start to drift into a sleepy haze, and the memories of my time away come flooding back.

I'm not really sure why this sauce reminded me of that. Maybe it's because this sauce is comfort in itself. The taste of it, so familiar and reassuring. Nothing bad could happen to you with a bowl of this in front of you, the smooth velvety texture and the soft rich taste. Comfort in a spoon.


Every food blogger and their mother has been talking about this sauce for a few years now, but actually, it's been around for ages. It's a Marcella Hazan recipe. Hazan is basically the Godmother of Italian cooking. Her book, "The Essentials of Italian Cooking," is a staple for all culinary bookshelves. At first glance, this sauce doesn't look like much. But looks can be deceiving, and the payoff of this recipe is in the taste. How is it possible that three simple ingredients can produce such a delicious result? I can't explain it. It's some kind of Italian culinary alchemy. But did you see the part where I said three ingredients? Yeah. That's right. Three.

And I'm guessing you already have them in your kitchen.

You have no excuses. Go.

Marcella Hazan's Tomato, Onion & Butter Sauce

1 28 ounce can San Marzano Tomatoes (you can also use boxed, diced tomatoes)
5 tbsp butter
1 yellow onion, peeled and cut in half (discard the peel but keep the root on the onion)

Combine all ingredients in a heavy-bottomed saucepan and bring to a simmer. Once the mixture is bubbling, lower the heat and simmer on low for 45 minutes, stirring occasionally and crushing the tomatoes against the side of the pan to release the juices. You'll see little bubbles of fat start to move to the top. Remove the onion, salt to taste and serve warm.

Thursday, January 21, 2010

Fly Me to the Moon - Amaretto Squeeze


It's raining cats and dogs. It's cold, it's windy, I mean, it's just plain nasty out. The last thing I want to do is go off to work. And now Frank Sinatra has made an appearance on my ipod, and all I really want to do is put on a flouncy cocktail dress, head to the Starlight Room at the top of the Francis Drake Hotel and be whirled around the dance floor to Frank Sinatra. I'd need a partner though. This could be a problem.

Yep, I'm in need of an old-school night. Cocktails, a good steak, heels, and dancing while dressed up. Very Mad Men.

That would be so much better than work.

Sinatra is one of the reasons I love weddings. People like to dance to Sinatra. It's just the thing to do. And you can do it shamelessly at weddings. Everyone joins in!

But, seeing as I most likely won't be ending up at the Starlight Room tonight, I should probably come up with a back-up plan. That plan will most likely involve my favorite cocktail of all time. Happy Hour anyone?

My sister introduced this cocktail to me years ago. She'd discovered it at one of the McMienamins pubs in Oregon. It's called an Amaretto Squeeze, and it is the most delicious thing. It just makes me happy. It may sound like strange combination, but I'm telling you, it's magic in a glass. The almondy, sweet taste of the Amaretto mixed with the bright sour citrus. It's divine. And it's so pretty! We make them all the time now, especially over the holiday's. It's a pre-dinner requirement. I make a pitcher of freshly squeezed juice, throw it over some ice cubes and top it off with Amaretto. It makes me happy. Maybe I'll put on Sinatra tonight while I drink it. I live in a studio. There's no one else to catch me dancing away!

Amaretto Squeeze
makes 2

1 large grapefruit
1 large orange
1 lime
2 shots Amaretto
ice cubes
rosemary for garnish

Squeeze the grapefruit, orange and lime. Remove the seeds. Pour in a highball glass over ice, add the Amaretto and stir. Serve and repeat!

Wednesday, January 20, 2010

For the Weekend - Cinnamon Rolls


Do you have plans this weekend? Is it raining or snowing where you are? Would you be interested in waking up on a drizzling Saturday or Sunday morning, padding about in your robe and slippers and slipping a batch of these babies into the oven? Of course you would. But there's a problem. See, this is a two day kind of affair. So what you might want to do, is start it on Friday if you'd like to eat them on Saturday, and start them on Saturday if you'd like to have them on Sunday. It does take some planning.

And maybe that's the last thing you want to do on a weekend. Plan anything. I can understand that. I myself would like to lounge in bed with a mug of coffee watching episodes of my new favorite "Friday Night Lights" until noon.


So maybe, if you're really lucky (as I am) you can con someone else into making them for you. Someone who has the wherewithal to start the recipe the day before, and who doesn't mine getting up early to stick them in the oven. My sister is good that way, and she makes her cinnamon rolls every Christmas. Another piece of the Christmas Breakfast feast, another tradition we have.

And if you've been lucky enough to have a cinnamon roll, hot and gooey right out of the oven. The pastry melting in your mouth, you'll know that a little planning and effort is well-worth it. It's perfect for a rainy weekend.


Cinnamon Rolls
an Alton Brown recipe

For the dough

4 large egg yolks, room temperature
1 large whole egg, room temperature
1/4 cup sugar
6 tbsp butter
6 ounces buttermilk, room temperature
4 cups flour, plus a little more for dusting
1 package instant dry yeast, about 2 1/4 teaspoons
1 1/4 teaspoons kosher salt
vegetable oil or cooking spray

For the filling

1 cup packed light brown sugar
1 tablespoon ground cinnamon
pinch of salt
1 1/2 tbsp melted butter

For the icing

1/4 cup softened cream cheese
3 tablespoons milk
1 1/2 cups powdered sugar

For the dough: in the bowl of a stand mixer with the whisk attachment, whisk the egg yolks, whole egg, sugar, butter, and buttermilk. Add approximately 2 cups of the flour along with the yeast and salt; whisk until moistened and combined. Remove the whisk attachment and replace with a dough hook. Add all but 3/4 cup of the remaining flour and knead on low speed for 5 minutes. Check the consistency of the dough, add more flour if necessary; the dough should feel soft and moist but not sticky. Knead on low speed 5 minutes more or until the dough clears the sides of the bowl. Turn the dough out onto a lightly floured work surface; knead by hand about 30 seconds. Lightly oil a large bowl. Transfer the dough to the bowl, lightly oil the top of the dough, cover and let double in volume, 2 to 2 1/2 hours.

Combine the brown sugar, cinnamon and salt in a medium bowl. Mix until well incorporated. Set aside until ready to use.

Butter a 9 by 13-inch glass baking dish. Turn the dough out onto a lightly floured work surface. Gently shape the dough into a rectangle with the long side nearest you. Roll into an 18 by 12-inch rectangle. Brush the dough with the 3/4-ounce of melted butter, leaving 1/2-inch border along the top edge. Sprinkle the filling mixture over the dough, leaving a 3/4-inch border along the top edge; gently press the filling into the dough. Beginning with the long edge nearest you, roll the dough into a tight cylinder. Firmly pinch the seam to seal and roll the cylinder seam side down. Very gently squeeze the cylinder to create even thickness. Using a serrated knife, slice the cylinder into 1 1/2-inch rolls; yielding 12 rolls. Arrange rolls cut side down in the baking dish; cover tightly with plastic wrap and store in the refrigerator overnight or up to 16 hours.

Remove the rolls from the refrigerator and place in an oven that is turned off. Fill a shallow pan 2/3-full of boiling water and set on the rack below the rolls. Close the oven door and let the rolls rise until they look slightly puffy; approximately 30 minutes. Remove the rolls and the shallow pan of water from the oven.

Preheat the oven to 350 degrees F.

When the oven is ready, place the rolls on the middle rack and bake until golden brown, or until the internal temperature reaches 190 degrees F on an instant-read thermometer, approximately 30 minutes.

While the rolls are cooling slightly, make the icing by whisking the cream cheese in the bowl of a stand mixer until creamy. Add the milk and whisk until combined. Sift in the powdered sugar, and whisk until smooth. Spread over the rolls and serve immediately.

Wednesday, January 13, 2010

Tradition - Swedish Pancakes


One of the great things about having a recipe blog is that now, for the first time ever, all of my recipes are landing in one easily accessible spot. A couple years ago, my friend Beth and I had meant to put together a recipe book for our friends and family. We never quite got around to it, but I still have hope.
It's a relief that I can just turn to my own blog when looking for a recipe I've done in the past that I can't quite return to from memory. Also, I only post the ones I like, so if it wasn't a big hit, it doesn't make it up here (there is the exception of my marshmallows post, but I blame that on myself, and not the recipe.) Case and point, my Grandmother's Swedish Pancake recipe. One I like to make for a large group of friends on vacation, and the staple in our house on Christmas morning. I just haven't quite committed it to memory yet. Working on it. For years over the holidays, she made breakfast special with these pancakes. Now, I've taken over, and they're one of my favorite things to make.

So, Swedish Pancakes (for those of you not of Nordic descent) are like miniature crepes. Sounds delightful, no? And they are. If you've never had them, you're missing out. They're melt in your mouth delicious. Served warm, drenched in maple syrup. You will need a Plett Pan, extra equipment, but totally worth it, they come relatively cheap, here's a good one. Ours has been passed down from person to person, and I actually received one for Christmas years ago. It's come in handy on those cold winter mornings, and it's certainly impressed my friends. Even if I have to do a quick email search to find the exact recipe. No more! Now I'll just look here.


Swedish Pancakes

3 eggs
2 tbsp sugar
3/4 cup flour
1 1/2 cups milk
1/4 tsp salt
lump of melted butter

Beat the eggs, add salt, sugar, flour and stir until well mixed. Add the milk gradually. Melt the butter in the Plett pan and add to the batter. Stir gently to combine, don't beat.

Add a tiny bit of butter to each pancake place in the pan, when melted, add a small spoonful of butter to each place, and cook over medium heat, turning with a knife when the batter has firmed and the bubbles in the middle are gone. Cook on the other side for about a minute.

It usually takes one batch to really get going, often the first batch sticks and is a wash. No matter! Press on and the next batch should work just fine. Add butter to each slot when cooking a new batch. Serve with maple syrup.

The Best Kind - Simple Roast Chicken with Herb Butter


It gives me a small amount of relief to look at the last few posts and know that they are without dessert and pastry qualities. I'm even more relieved to continue on this savory riff, and finally add a roast chicken recipe to this blog. Because no food blog would be worth much of anything did it not contain a good, simple roast chicken. It's one of my favorite meals, and it's so easy.

But should you start to worry, should your sweet tooth start to ache and should you start to feel those all too familiar pangs of the sugar craving, let me reassure you: more tarts and cakes and other sweet things to come. I've not nearly exhausted the recipe collections amassed over the holidays, they're all sitting on my desktop, waiting to be immortalized here. And to come pipping hot out of your own oven.

I do hope you're playing along at home.

Especially when it comes to roast chicken.

I was able to work from home for two weeks this past holiday. There were some things going on at home and I felt I needed to be there to help out. The day before I left, I was frantically packing several suitcases and cleaning my apartment, making sure everything was in order before I left. I didn't have any food in the house, and quite honestly, I didn't have much of an appetite. That's when I got a call from Leah, "I'm coming over. I'm bringing the dog and I'm making you a roast chicken."

Is there any kind of better call that that? I ask you.

The answer is no.

So she did. I cleaned, and packed, and showered while she chopped, and seasoned, and roasted. The smells emanating from my kitchen were beyond glorious, and my appetite seemed to magically restore itself. The smell of roast chicken will do that to you.

And then we sat down, ate and chatted. It was a perfect sendoff. I thought about how lucky I was, and how delicious the meal was. It's really the perfect thing to cook at just about anytime. Here is an easy recipe for that:

Simple Roast Chicken with Herb Butter

1 3-4 lb organic chicken (it's all about the quality of the bird)
Kosher salt and freshly ground pepper (a little over 1 tbsp of salt)
2 tbsp butter
1 tbsp fresh, chopped rosemary
1 tbsp fresh, chopped thyme

Preheat the oven to 450. Rinse the bird, pat it dry with paper towels, inside and out. Make sure the bird is very dry, otherwise it will steam in the oven. Combine the herbs, salt & pepper and the butter. Using your fingers, stuff the two breast pockets with a bit of the herb butter. Using your hands, cover the bird in the rest of the butter mixture. Season with pepper to taste. Truss the bird, making sure the wings and legs are very tight against the bird. Stick in a saute pan or dutch oven, and roast for 50-60 minutes. Once the chicken is done, remove it from the oven, baste it with the juices from the pan, and let it sit for 15 minutes to rest. Remove the twine and serve.

Monday, January 11, 2010

A Good Evening - Creamy Gorgonzola Polenta

It would be blasphemy. Truly. To call polenta the new "mashed potatoes" would be true and absolute treason. I could never do it. I would never forsake my favorite food of all time. There's just nothing else like them, nothing else that goes so perfectly well with everything from chicken, to roast to, well, whatever else you'd like to pair with it. Me? I just like a straight bowl with some butter a salt. Preferably first thing in the morning.

Mashed potatoes: Breakfast of Champions.

But. I hereby acknowledge polenta to be a runner-up in the comfort food challenge. Especially when you add cream and gorgonzola and serve it with the Cabernet Braised Short Ribs.

Hot dog! That is delicious.

I've actually been taking to making this polenta on it's own now. Tuesday evening was a cozy affair. Me, curled up in my overstuffed armchair with a bowl of this polenta with a blanket around me, the heat turned up and the newest installment of my favorite guilty (horrible) pleasure "The Bachelor: On the Wings of Love." (btw, if you watch this sociological nightmare, I offer an escape for you: I hereby make the outrageous claim to know how this season ends. Care to know? Email me and I'll share.)

Are you still with me? Now that I've shared such a deep, dark and secret love of such a terrible television show? I don't blame you if you stopped reason. It's horrible. I know it.

So there I was, in bad television, warm, comfort-food bliss. All in all, it was about as good as a Tuesday night can get. What can I say? I'm easy to please (though several ex-boyfriends might attest otherwise...)

The point is, this stuff is good. Delicious in fact. It's a cinch to make and it'll do in a mashed potatoes pinch. Served with the short-ribs, it's practically unbeatable. So without further ado...


Creamy Gorgonzola Polenta
serves 8
from Bon Appetit

5 cups Chicken Broth
1 3/4 cups Polenta
3/4 cup crumbled Gorgonzola or other blue cheese
1/3 cup whipping cream

Bring the chicken broth to boil in a heavy bottomed pan. Gradually add the polenta, whisking as you go. Return the mixture to a boil, then reduce the heat to low, cover and simmer until the polenta is tender, stirring frequently and adding more broth if the polenta gets too thick. Cooking time is about 10 minutes all together. Add gorgonzola and cream, stir until the cheese has melted. Season to taste with salt and pepper.

Tuesday, January 5, 2010

Back Into It - Mixed Herb Gremolata

I can't even say I feel guilty about being away from here for so long. There was just too much to do and too many people to love in real life.

Life has been a whirlwind for the last several weeks. I closed a show, packed my bags, flew to Portland and spent the most time with my family ever since being out of college, and on the day I turned 29, I flew back to the Bay, repacked a bag and drove to Tahoe with friends to celebrate the New Year. After much snow, sledding, fiery bloody mary's thai food and chocolate birthday cake, I then drove back and met up with good friends for a hike to the Tourist Club on Mt. Tam in Marin. It's been a spectacular few weeks. And now (as is always the case after the holidays) the adjustment back to reality is proving to be difficult.

Back to work, back to life, back to the computer screen and the studio apartment and the laundry, the cleaning and the stocking of the refrigerator. Oh vacation, I will miss you so.

In the spirit of mourning the days that are now past, I bring you recipes past. We'll start out slow, easing our way back into the blogging. This is the Gremolata that accompanied the fantastic Cabernet Braised Short Ribs I made for my family before Christmas. Keep your eye out for the accompanying Polenta with Gorgonzola and Cream, it was the height of comfort food.


Mixed Herb Gremolata
adapted from Bon Appetit

1/4 cup chopped Italian Parsley
3 tbsp finely grated lemon peel (I used meyer lemons)
2 garlic cloves (I sauteed the garlic for about 30 seconds in a tiny bit of olive oil, removing it before it turned brown)
1 1/2 tbsp fresh rosemary, finely chopped
1 1/2 tbsp fresh thyme, finely chopped

You can choose to saute the garlic or add it raw. Mix all ingredients together and add lemon juice to taste. Sprinkle on top of the short ribs, or whatever protein you choose.

Wednesday, December 23, 2009

Comfort Food - Cabernet-Braised Short Ribs

It's not that I haven't been cooking lately, I have. I've been cooking for five actually, which is a huge accomplishment for a girl used to cooking for one or two. Making sure you have enough for everyone and that it all works out mathematically, well, that's not exactly my strong suit.

Earmarking a good recipe, that I can do. Pulling it all together and whipping up a Cabernet reduction, I can do that as well. Math, however...that's another story. Thank god for conversion calculators.

But the point is, I'm here. I've been cooking. I just haven't been getting good pictures. It seems night falls around 3pm here in Portland, and the food never seems to last long enough to get a decent picture. So I can't exactly show you how good the Cabernet-Braised Short Ribs were over Gorgonzola Polenta with a Mixed Herb Gremolata. You'll just have to take my word for it. And, I mean really, doesn't that sound pretty good? Serious winter comfort food. Perfect for when there's freezing fog outside and the rain continues for days on end. Thanks Portland, you really know how to welcome a Californian!

Anyway, it was good. Damn good. And can I tell you something else, something kind of shocking? I'd never made polenta before. Well, not the kind that you add broth to and stir. The "cut a slice off from a tube" Trader Joe's kind I've done. This new-to-me stuff is far superior. Add cheese and cream to it and it was gone in seconds flat. It's a keeper.

Well done self. Family approved meal. Even the 6 year old and the toddler liked it.

Recipes for the Gorgonzola Polenta and Mixed Herb Gremolata meant to be served with this dish will follow this week. No pictures of the final plating, but really, you can't go wrong.


Cabernet-Braised Short Ribs
from Bon Appetit
serves 8

8 lbs short ribs
2 tbs fresh rosemary, chopped
2 tbsp fresh thyme, chopped
1 tbsp kosher salt
1 tbsp freshly ground black pepper
1/4 cup vegetable oil
2 750ml bottles Cabernet Sauvignon
2 tbsp butter, room temp
2 tbsp flour

Season the meat with the salt, pepper, rosemary and thyme overnight before cooking.

Arrange the ribs in a single layer in a 15x10 baking dish. Season with the salt, pepper, rosemary and thyme. Cover and let sit in the refrigerator overnight. Let stand at room temp for 1 hour before continuing.

Preheat the oven to 375. Heat 2 tbsp of vegetable oil in a heavy, wide ovenproof pot over medium-high heat. Working in batches, brown the meat on all sides, about 8 minutes per batch, adding more oil to the pot if needed. Transfer the ribs to a plate, and pour out the drippings in the pan, discard. Add the wine to the pot and bring to a simmer, scrapping up all the brown bits. Return the ribs to the pot; bring to a boil. Cover; transfer to the oven and braise until the meat is very tender, about 2 hours.


Using a slotted spoon, transfer the ribs to a large bowl; cover tightly to keep warm. Skim any fat from the top of the braising liquid. Boil until the liquid is reduced to 2 generous cups. About 20 minutes.

Mix 2 tbsp butter and 2 tbsp flour with a fork in a small bowl until well blended, whisk into the reduced braising liquid over medium-high heat until the sauce thickens, about 2 minutes.

Serve over Gorgonzola Polenta and garnish with Mixed Herb Gremolata.